
How to qualify and prioritize quiz leads: AI agents and segmentation
Quiz leads are some of the easiest to work with. They arrive with context: you already know the buyer’s budget, timeline and preferences before you pick up the phone. Some are ready to buy today, others need time and nurturing. And in many niches, the company that calls first often gets the client. That’s why it pays to automate lead qualification: each lead gets a priority based on its quiz answers, and your sales managers know exactly who to call first.
In this guide, we compare three ways to do it on a real estate quiz:
- an AI agent you build visually using the n8n platform
- an agent you ask an AI assistant to write for you
- Marquiz segments with Telegram notifications, which need no code at all.
We didn’t just read the docs: we built all three setups by hand and tested them on a live quiz, so every tip below comes from that experience, including the spots where we tripped up. Pick the method that fits your skills and budget, or start with the simplest and grow from there.
Start with the rules: what makes a lead qualified
Any automation is only as good as the rules behind it. So before you choose a method, write down what a qualified lead looks like for your business, based on the answers your quiz collects.
We used a quiz for an agency that sells condos in Bali.

Three questions cover what matters most: buyers’ intent, urgency and budget.
| Question | Answer options | What it tells us |
| What’s your main purpose for buying a property in Bali? | • Relocation • Investment and rental income • Vacation or part-time living • Just exploring options |
Intent |
| When do you plan to visit Bali to view properties? | • Already in Bali • Within the next 1–2 weeks • In the next few months • Not sure yet |
Urgency |
| What price range are you considering? | • Under $100,000 • From $100,000 to $300,000 • From $300,000 to $500,000 • $500,000+ |
Budget |
From these answers, we built three rules.
- A lead is “Qualified” only if it has a clear purpose (not “just exploring”) and is either in Bali already or coming within 1–2 weeks.
- Budget doesn’t rule anyone out; it only sets the priority: “High” from $100,000, “Medium” below that.
- Every disqualified lead gets “Low.”
Methods 1 and 2 give these rules to an AI model as a system prompt. Here’s a shortened version you can adapt to your niche:
# ROLE
You are a real estate lead qualification assistant for property in Bali. Analyze each quiz lead and decide whether it goes to the sales team (QUALIFIED) or to a long-term nurturing sequence (DISQUALIFIED).

# CRITERIA
1. INTENT. Qualifies: relocation, investment, rental income, vacation, part-time living. Fails: "just exploring options" or no clear purchase intent, whatever the budget.
2. URGENCY. Qualifies: already in Bali or coming within the next 1-2 weeks. Fails: coming in the next few months or not sure yet.
3. BUDGET sets the priority only.

# RULES
- QUALIFIED only if both INTENT and URGENCY qualify. Otherwise DISQUALIFIED.
- QUALIFIED and budget $100,000 or more: priority HIGH.
- QUALIFIED and budget under $100,000: priority MEDIUM.
- DISQUALIFIED: priority LOW.
- Priority must be exactly HIGH, MEDIUM or LOW. Never use any other value.
- Base the reason only on the lead's actual answers.

# OUTPUT
Return only valid JSON, with no markdown and no extra text:
{"status": "QUALIFIED" or "DISQUALIFIED", "priority": "HIGH", "MEDIUM" or "LOW", "reason": "One sentence in English explaining the decision."}
Method 3 builds the same logic right from the quiz answers, without any AI.
Methods 1 and 2: send leads to Google Sheets first
Both AI methods read leads from a spreadsheet, so connect it first. In the quiz editor, open Integrations → Google Sheets, sign in with Google, then create a new spreadsheet or connect an existing one. Marquiz adds a sheet named after the quiz, and every new lead becomes a new row. Click Publish to save. Full guide: How to integrate a quiz with Google Sheets.
💡 Google Sheets export is available on the Plus plan. On Free and Start, use a webhook instead: it works on every plan and sends each new lead straight to another service (How to use Webhooks). For example, an n8n Webhook node can receive the lead and add it to your sheet by itself. The automation gets a few extra steps, but you don’t need the Plus plan.
Then open your spreadsheet and add three empty columns for the agent’s verdict: Status, Priority and Reason.
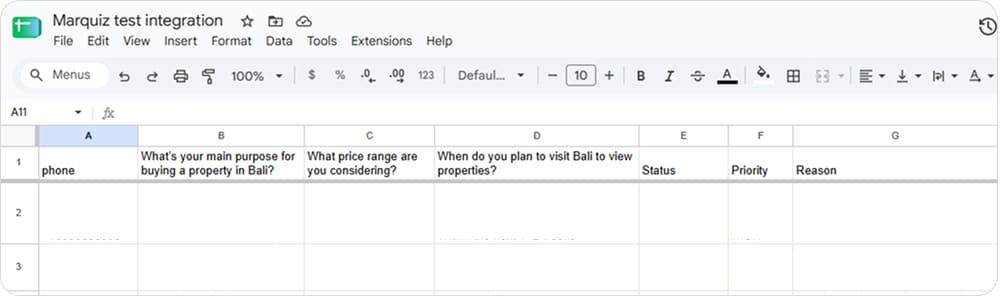
The spreadsheet after the integration: quiz answers on the left, the agent’s columns on the right
Method 1. Build an AI agent in n8n
n8n is a visual automation platform: you connect blocks called nodes, and data flows from one to the next. If you’ve never worked with AI agents, this is the best place to start. Every step is on the screen: you can open any node and see exactly what came in and what went out, so the logic of an agent stops being a black box.
✍️ From the author: I’m not a developer, and this was my first AI agent. The hardest part wasn’t the logic but the setup: connecting Google took me a few tries, and the script I later got from Cursor wanted to run on Vercel, which turned out to be the wrong platform. If I could do it, so can you.
Our workflow has four nodes:
- Google Sheets Trigger checks the sheet once a minute and picks up new rows.
- AI Agent with an OpenAI Chat Model reads the row and applies the rules from the system prompt above. We used gpt-5-mini: the task is simple, and a smaller model is fast and cheap.
- Google Sheets with the Update Row operation writes status, priority and reason back into the same row. Match rows by
dt_created, the submission time Marquiz records for each lead. - Telegram sends you the verdict. Add an If node in front of it to get pings only about QUALIFIED leads.
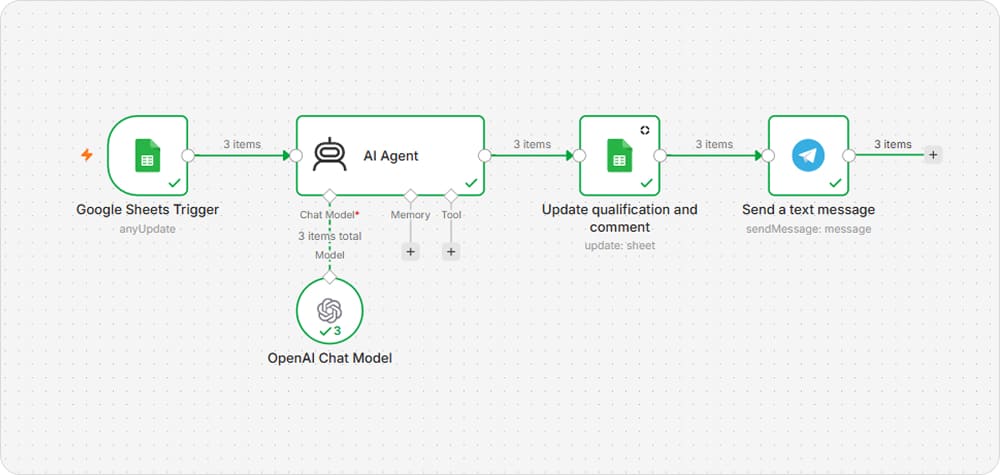
This simple automation workflow features four nodes: Google Sheets Trigger, AI Agent, Google Sheets Update Row and Telegram
Accounts and keys you’ll need
You’ll need an n8n account and three sets of credentials. Here’s where to get them:
| What | Where to get it |
| n8n account | n8n Cloud has a free trial; the self-hosted Community edition is free: Choose how to use n8n. |
| Google access | On n8n Cloud, click Sign in with Google and tick every checkbox on the consent screen, both Sheets and Drive. On self-hosted n8n, or if the button fails, create your own OAuth client. |
| OpenAI API key | API keys page → Create new secret key. |
| Telegram bot token | Message @BotFather and send /newbot. BotFather then helps you set up the bot and sends you its token. |
💡 A few things beginners often trip over. A ChatGPT subscription doesn’t cover the API, so add credits on the OpenAI platform before testing. And to find your Telegram chat ID, search for @userinfobot in Telegram, open the chat and press Start: the bot replies with your numeric ID right away. One more thing before the first test: open your own bot and press Start too; otherwise, Telegram won’t let it message you.
What we saw in testing
In our test runs, the agent qualified every lead correctly: the right status, the right priority and a clear reason. Still, language models can make mistakes now and then. Read the Reason column during the first week to make sure the agent follows your rules. And if a rule must never break (for example, “just exploring” always means “Disqualified”), move it from the prompt into an If or Switch node, where it works like a spreadsheet formula.
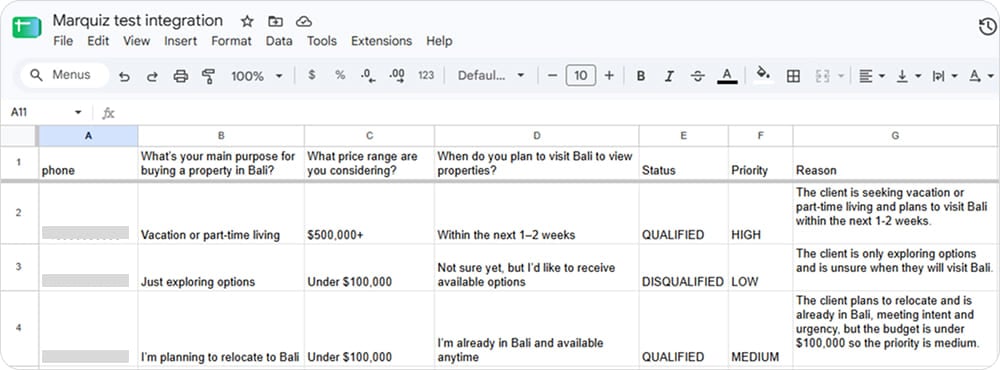
The agent fills in Status, Priority and Reason for each new lead

The workflow then sends a Telegram message via the bot with the priority and the reason behind it
Method 2. Ask an AI assistant to write the agent for you
If you’d rather skip the visual builder, describe the agent to Cursor or another AI assistant and ask it to write a script. The logic stays the same: read new rows, ask the model, write the verdict, send a message. The difference is that the script needs a place to run on a schedule, and that part is on you.
The prompt
Copy this prompt, fill in the brackets and paste your qualification prompt from above where indicated. Take the column headers and the tab name straight from your spreadsheet, letter for letter. Marquiz names the columns after your quiz questions and keeps the phone number in the phone column. The tab gets the quiz name plus the date of the integration, so it’s usually longer than the quiz title. If you rename the tab, use the new name in the prompt.
Create a new project for this in an empty folder. Write a Python script that processes new quiz leads in a Google Sheet. It will be started on a schedule every 1-5 minutes, so don't build an endless loop inside it.

1. Connect to the Google Sheet [SHEET URL], tab "[EXACT TAB NAME]", using a Google service account. Read the credentials from an environment variable that can hold either the path to the JSON key file (for local runs) or the full JSON content (for cloud platforms).
2. The sheet has these columns: [PASTE THE EXACT HEADERS: the three quiz questions, "phone", "Status", "Priority", "Reason"]. If Status, Priority or Reason are missing, create them.
3. Find all rows where "Status" is empty. Before processing a row, write "PROCESSING" with the current time into Status so it isn't picked up twice. Treat rows stuck in PROCESSING for more than 10 minutes as new.
4. For each row, send the answers to the three quiz questions to the OpenAI API (model gpt-5-mini) with this system prompt: [PASTE YOUR QUALIFICATION PROMPT]. Read the OpenAI API key from an environment variable.
5. Parse the JSON response and write status, priority and reason into "Status", "Priority" and "Reason" of the same row.
6. After the row is updated, send a Telegram message with the priority, the reason and the value from the "phone" column to chat ID [CHAT ID]. Read the bot token from an environment variable.
7. Add error handling and logging: if a row fails, clear its Status so it's retried on the next run, and keep processing the other rows.
8. For local runs, keep all keys in a .env file and add .env to .gitignore.

Then explain step by step, for a beginner, how to test the script on my computer and how to run it on [CHOSEN PLATFORM].
Keep real keys out of the chat with the AI assistant. The script reads them from environment variables, which are settings stored outside the code. On your computer, they live in a .env file that must never be uploaded to GitHub, which is why the prompt adds it to .gitignore. On a hosting platform, you paste the same keys into its settings, for example GitHub Secrets. A cloud platform can’t see the JSON key file on your computer, so there you paste the full content of the file instead of its path. And if you change something in .env, restart the script: one that’s already running won’t pick up the change.
💡 If something doesn’t work, just ask the AI assistant. Paste the error message or describe what happens, for example “the script runs, but the Status column stays empty,” and ask what to do. The assistant explains the cause in plain words, suggests a fix and can usually apply it right in the code. The same works for setup steps you don’t understand: ask it to walk you through them one by one.
Keys for the script
The OpenAI key and the Telegram token are the same as in Method 1, and the same two checks apply. Your OpenAI account needs a positive balance: without credits, the script fails with a quota error even though the key is correct. And whoever gets the notifications must open your bot and press Start first. The new part is a Google service account, a robot account the script uses to edit your sheet:
-
In Google Cloud Console, create a project and enable the Google Sheets API in APIs & Services → Library.
-
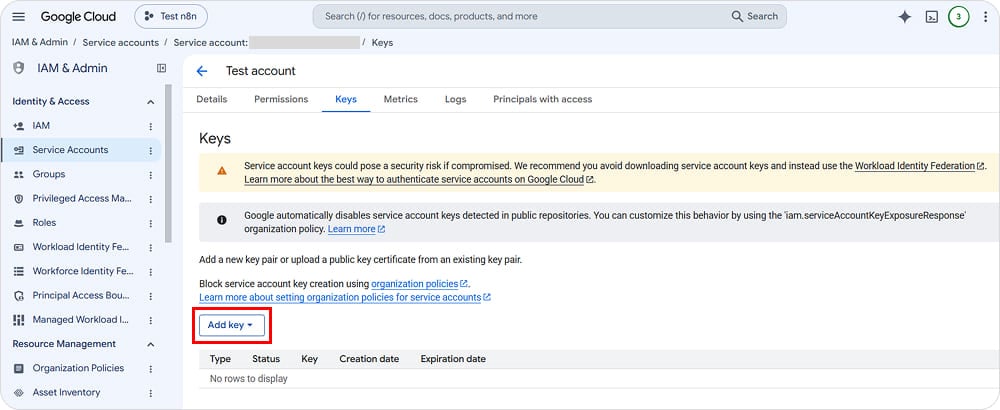
Create a service account and download a JSON key for it: Google Cloud: create service accounts. The key is a .json file that starts with
{and containsclient_emailandprivate_key. Treat it like a password.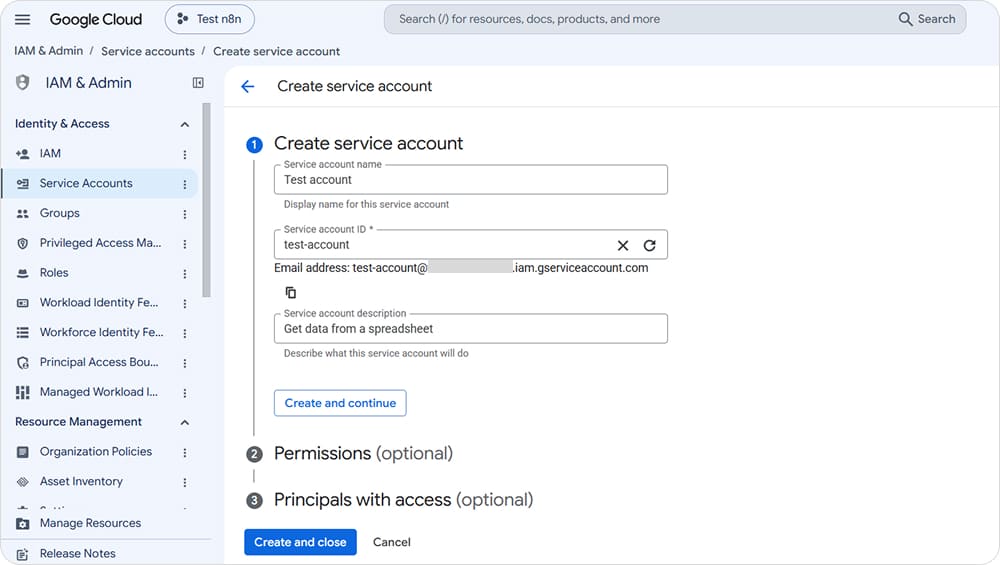
-
Open your spreadsheet, click Share and add the service account’s email (it ends with
iam.gserviceaccount.com) as an Editor. Without this step, the script can’t see the sheet.
If you use a company Google Workspace account and key creation is blocked, ask your admin or switch to the Apps Script option below, which needs no service account.
Where to run the script
Here are options that work in most regions:
| Where | How often | Cost | Good to know |
| Google Apps Script | Every 1, 5, 10, 15 or 30 minutes | Free with a Google account | Runs inside the spreadsheet: no server and no service account. Gmail accounts get 90 minutes of trigger runtime per day (quotas), so every 5 minutes is the safe choice. If a run fails, Google emails you. |
| GitHub Actions | Every 5 minutes at most; runs can be delayed at busy times | Free for public repositories; private ones use included minutes, which a frequent schedule spends fast (billing) | Store keys in GitHub Secrets. In a public repository, schedules switch off after 60 days without activity. |
| A small VPS with cron | Every minute | Monthly fee | The most predictable option, but you maintain the server yourself. Any global provider works, such as DigitalOcean, Hetzner or Vultr. |
| Your own computer | As often as you like | Free | Works only while the computer is on and the scheduled script is running as a separate process. Closing the terminal or the editor stops it. Fine for testing, not for real leads. |
One platform to skip for this task is Vercel. AI assistants often suggest it, but on the free Hobby plan cron jobs run only once a day, and more frequent schedules need the paid Pro plan (Vercel docs).
For most beginners, Apps Script is the easiest path. Ask the AI assistant for it directly by replacing the first lines of the prompt:
Write a Google Apps Script bound to my Google Sheet that processes new quiz leads on the tab "[EXACT TAB NAME]". Store the OpenAI API key and the Telegram bot token in Script Properties, not in the code. Add a function that creates a time-driven trigger every 5 minutes.Keep steps 2 to 7 from the main prompt as they are. Script Properties are the Apps Script place for keys, a bit like a .env file: how to add them.
Method 3. Segments and Telegram notifications in Marquiz
The simplest option needs no API keys, no scripts and no hosting: Marquiz can sort leads by itself. Segments group visitors by a combination of answers, and Telegram notifications deliver each lead, already labeled with its segment, the moment it arrives. You set everything up right in the quiz editor, and Telegram notifications work on every Marquiz plan, including Free.
Step 1. Create segments
Segments live next to branching in the quiz editor:
-
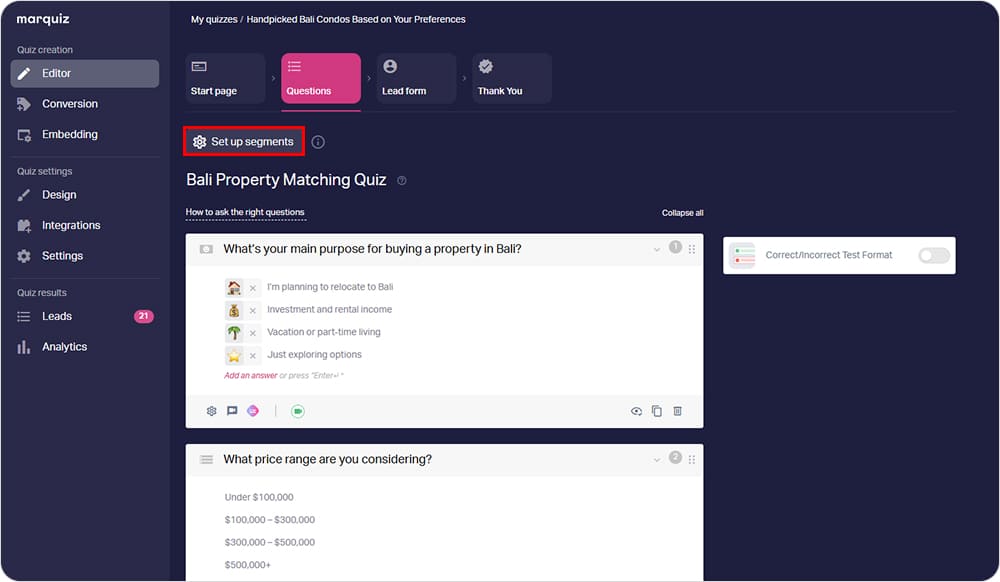
Open the quiz, go to the Questions block and click Set up segments → Create segment.
-
Name your segments, for example “High priority,” “Medium priority” and “Low priority.”
-
On each segment card, click Set up and select the answers that put a visitor into the segment. For “Low priority,” we picked Just exploring options, In the next few months and Not sure yet. For “High priority,” we required all of these: a clear purpose, a budget from $100,000 and being in Bali already or visiting within 1–2 weeks. “Medium priority” has the same purpose and timing conditions, but the budget is Under $100,000.
-
Choose the logic. Require at least one condition means any single matching answer is enough. Require all conditions means the visitor must match every answer.
-
Click Publish.
The segment name arrives in every Telegram message, so pick names your managers will understand at a glance. In the Leads section, each lead also shows a marker of the segment it matched.
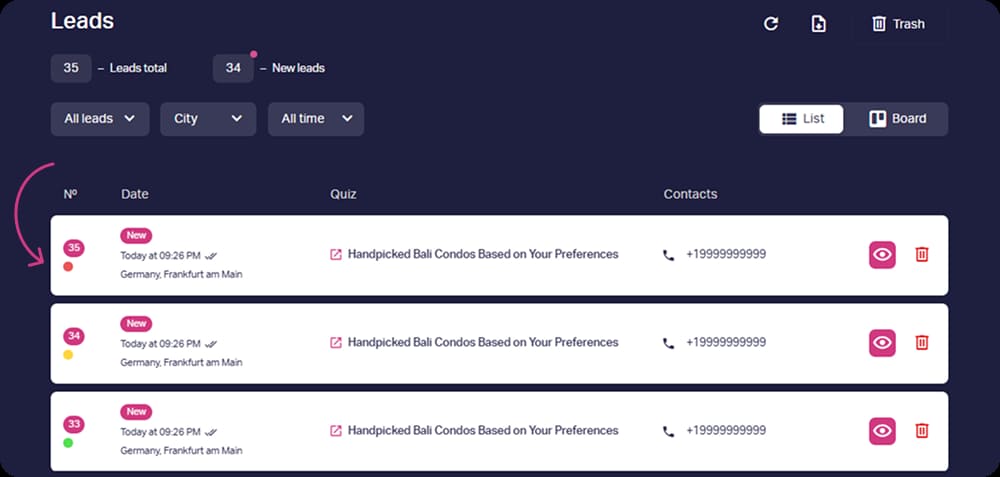
🔴 means Low priority, 🟡 is Medium priority and 🟢 marks High priority
Go further: set up a separate funnel for each segment
Segments don’t just label leads: they can also shape what happens next. Once a visitor lands in a segment, the rest of the quiz can follow its own path: different follow-up questions, a different result, its own offer on the contact form and its own Thank you page. In our example, the “Low priority” group could get a property list via WhatsApp, “Medium priority” leads could see a selection of condos under $100,000 and “High priority” leads could get an invitation to book a viewing. You don’t need this to qualify leads, but it’s worth trying once the basic setup works. Step-by-step guide: Audience segmentation in a quiz
Step 2. Get leads in Telegram
-
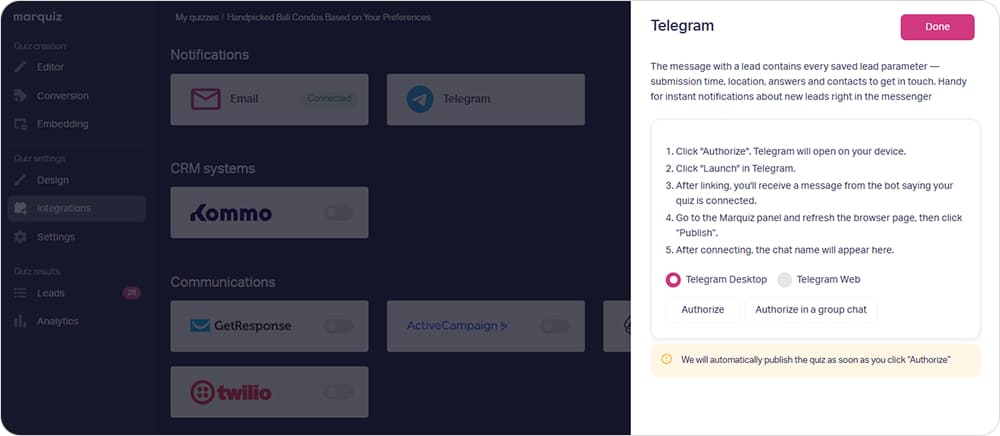
In the quiz editor, open Integrations → Notifications → Telegram.
-
Choose Telegram Desktop or Telegram Web.
-
Click Authorize to get leads in your personal chat. To notify the whole sales team, create a group in Telegram first, add your colleagues and click Authorize in a group chat.
-
Telegram opens. Click Launch in the bot chat and wait for the bot to confirm that your quiz is connected.
-
Go back to the Marquiz panel and refresh the page. The Telegram toggle is now on.
Each message contains every saved lead parameter: contacts, answers, location and the segments the lead matched, for example “Segments: High priority.” So your manager doesn’t have to read through the answers to decide who to call first: the label is right there in Telegram. If your team lives in email, the Email notification next to it works the same way: add one or several addresses and, if you like, a custom subject line.
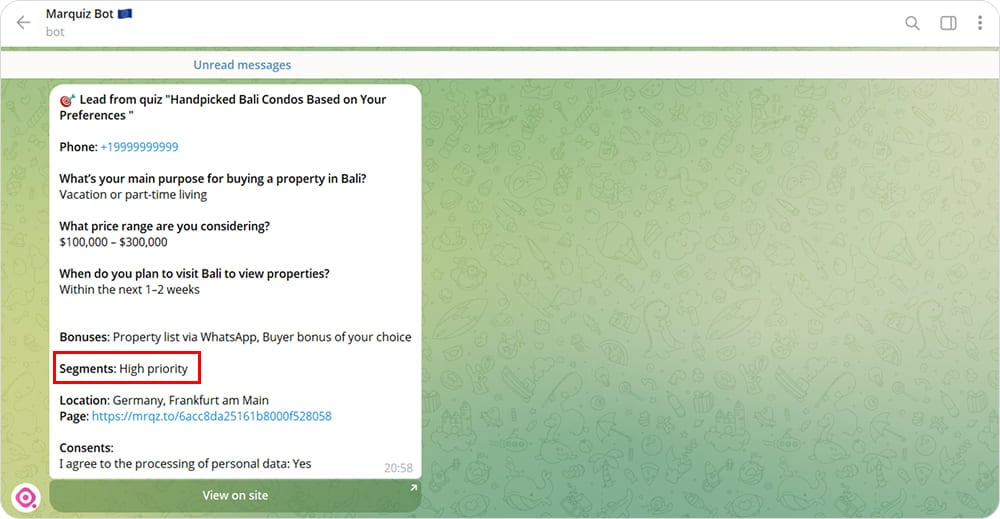
Marquiz Bot sends you the new lead’s phone number, answers and assigned segment
Step 3 (optional). Keep a lead log in Google Sheets
Telegram is great for reacting fast, but a chat feed is hard to search later. Connect the Google Sheets integration described above, and every new lead lands in the sheet with its segment in a separate column called segments. Turn on a filter (Data → Create a filter), open the filter on the segments column, choose Filter by values and leave only “High priority” ticked to see your hottest leads, or sort by date to check how many hot leads came in this week. It’s a simple CRM that needs no setup beyond the integration. Google Sheets export is available on the Plus plan.
Get lots
of leads — steadily
and affordably
A quiz delivers better results —
no extra ad budget needed

Which method to choose
All three methods get hot leads to your team faster. They differ in how much you build yourself and how flexible the logic is.
| AI agent in n8n | Script written by AI | Marquiz segments + notifications | |
| Difficulty level | ☕☕ Medium No coding, but you’ll learn how nodes and credentials work |
☕☕ Medium You’ll need to be comfortable with keys, settings and step-by-step instructions |
☕ Easy No special skills or knowledge needed |
| Extra costs | n8n plan or your own server, plus AI model usage through the API of your chosen provider | AI model usage through the API of your chosen provider, plus hosting if you don’t use Apps Script | None (the optional Google Sheets log needs the Plus plan) |
| Logic | Any rules in plain words, plus a reason for each lead | Same as n8n, and fully editable code | Fixed rules built from answers, with the segment name in every notification |
| Best for | Learning how AI agents work and building further automations | Custom setups without a visual builder | Most quizzes where you need to sort leads and react fast |
Step-by-step guides from our knowledge base
Audience segmentation in a quiz
Key takeaways
- Decide what “qualified” means before you automate. Intent, urgency and budget, written as plain rules, are the base for every method.
- For most quizzes, segments plus Telegram notifications are enough: no code, no API costs and every lead arrives in Telegram already labeled with its segment.
- n8n is the best place to learn how AI agents work: every step is a visible node, and you can see the data moving through it.
- An AI assistant can write the same agent as a script, but you still need to get the keys, pick a place to run it and keep an eye on it.
Start with segments and notifications: they take a few clicks and work right away. Open your quiz in Marquiz and set up your first segment today.